Astral Tabletop: City of Mist Guide

When you Join a Game
Await for the MC (GM) to assign a character sheet for you or if you have the template or a pre made character choose Use a Saved Character. No need to create or import unless you have the template. There is no need to use the Build Character button either.

Deleting a Character Sheet
If it's to late and you already created the useless blank sheet just open the character sheet (Space Bar) and delete it in the Manage Character button

Switching Characters
If you have two or more characters in the game and needs to switch between them (maybe to delete one?) use the menu in the left bottom corner (the big circular button) or Ctrl+Enter

Saving your Character
When you finish the creation of your char you can save it to your Vault, in the Manage Character menu. This way you can import it later in any game you enter in the future and you're safe from any accidental deletion done by the MC. If you do not save it the character will be only accessible in the game that it was made. And if it is deleted there it's gone for good.
Video: Fill this sheet out!
Zoom In, zoom out and scroll
Double click in any empty space on the sheet to zoom in to that area. Double click again to zoom out. Jump between pages using Page Up and Page Down keys, scroll or click n'drag.

Writing in the sheet
To start to fill in the values for tags and stats just double click on a field. Hit Enter to break lines when needed/wanted. You don't need to use the Build Character button for nothing when filling the stats. this is just used to make modifications on the template, so be really careful when messing around with it.

Change text colors and appearance
To help you rapidly differentiate between Mythos and Logos themes you can change the text color of any field. Just double click on it and go to the tab Sheet Display and select a new color there. It's also possible to edit font, font size, basic style formatting and background color.

Change token
You can change your character's token by clicking on the CoM logo at top left of the sheet and upload a image asset to your Vault (Upload Assets). After that you need to click again and enter in My Assets to select it. To fast create circular images you can use an online service like Token Stamp 2.

Statuses (Tracking Cards)
Use the green button in the card (ON by default), to toggle if the card must be added to the rolls. Keep an eye on the Status value shown at the top of the sheet to find out how much it's scoring. Statuses are negative by default but you can make it positive by checking the plus sign (+) in the tag line.

Juice and Clues (Tracking Cards)
Use the panel at the left of the tracking cards to register banked Juice🔋 points as well as any Clues 🔎. For the Juice double click the number stat and type-in the value. For Clues you have the method and source for each clue and a number of points. Double click the points in the row to fill in the values. The total amount of clues displayed in the top is equal to the sum of all your clue points.
Video: This is how we roll!

Making Rolls
There is three ways to make rolls with this template (four if you consider the simple chat window dice rolls of any vtt):
-
Check tags and Roll: mark your tags and click the Roll button at the top right of the sheet. It automatically rolls 2D6 and adds the power + weakness + statuses values, also displaying them in a list in the chat window. Use the MDF stat (modifier) to add or subtract values that can't be checked, as for example Help and Hurt points.
-
Actions using the actions buttons (bottom part) or the Moves titles: this will make the same roll as above, but also display the rules for the selected action. Good for new players, so they can learn the ropes.
-
Roll table action: the last Action button (the one with the star icon). Shows in the chat a table with Power levels from 0 to 6 and buttons to make a roll. No need to check any tag for that, just decide on the power level of the move and click the appropriate entry.

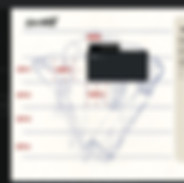
Troubleshooting: Careful to not cover other fields
If there is blank line at the end of a field it can cover another one that is not related. Remove the rogue line to be able to click on the field below. See in the image at left how a simple line covered all access to the Attention Fade/Crack check boxes.
For MC's: Dangers and Case sheets
Case Sheet
Contains four pages: Iceberg's Case, MC Tracking, Series Resources and a Danger's Sheet. You can make annotations directly in the icebergs sheet by double clicking red texts and formatting like the examples, or you can import your own image of the iceberg case (see below).

Importing your own Iceberg image
First click on the Build Character button and on the top right click on the Pages button. Click on it and choose Replace to exchange the image for one of your own.

Dangers page and Dangers sheet
If you don't wanna use a lot of dangers in a particular case/session maybe the five danger notes in the last page will suffice. But if you need more just go with the Danger's Sheet directly. You can even create multiple of them to keep things organized as per depth or per case, as you seen fit. There is also have a page dedicated to register player statuses and other notes (see below).

Annotations & Players Statuses
Use this part of the dangers sheet to keep track of your players statuses and any other importante notes that you would like to maintain. Remember that you can also make annotations in each players Character Notes section, including notes that will only appear to the MC (GM).
Save it, always...
Remember to always save the sheets you fill to your Vault. This way you can import them as a new character controlled by you in any game you enter/opens and you can just as easily pass the control of this char to any player (if you're the MC).